In a world often craving instant gratification, there's a certain magic in the slow, deliberate process of baking. Yet, for many, the thought of making homemade bread conjures images of endless kneading, sticky counters, and failed attempts. Enter the phenomenon that has swept kitchens worldwide: no knead bread. This incredibly simple yet profoundly rewarding method has transformed countless novice bakers into confident artisans, proving that exceptional bread is not only achievable but also surprisingly effortless.
From its humble beginnings, skyrocketing to "COVID baby" status in kitchens across the globe, the no-knead method has earned its viral reputation for a reason. It delivers a crusty, airy loaf with minimal hands-on time, making it the ultimate recipe for busy individuals and aspiring bakers alike. If you've ever dreamt of pulling a warm, golden-brown loaf from your oven but felt intimidated by traditional bread making, prepare to have your world (and your kitchen) transformed.
The Viral Sensation: How No-Knead Bread Conquered Kitchens
The journey of no knead bread from an obscure technique to a culinary sensation began in 2006, when Jim Lahey, owner of New York's Sullivan Street Bakery, shared his revolutionary recipe with Mark Bittman of The New York Times. Bittman's article, which proclaimed it "the easiest bread you'll ever bake," ignited a firestorm of interest. The recipe became one of the most popular ever published by The Times, and its fame only grew, fueled by home bakers sharing their successes and variations.
Fast forward to recent years, particularly during periods of increased home cooking, and the no-knead phenomenon experienced a resurgence, becoming a comforting ritual for many. What made it so universally appealing? Perhaps it was the promise of a delicious, artisanal-quality loaf without the specialized equipment or extensive muscle required for traditional methods. Or perhaps it was the sheer delight of creating something so fundamental and satisfying from scratch, proving that even a "bread baby" could be a source of immense pride and delicious sustenance.
Imagine gifting a neighbor a warm, fragrant loaf, knowing it took minimal effort but delivered maximum impact. The rave reviews are inevitable; people simply can't believe something so good could be so easy. This recipe isn't just about baking bread; it's about demystifying a complex craft and empowering everyone to experience the joy of homemade goodness.
The Magic Behind the Method: Unpacking No-Knead Science
At the heart of the no knead bread method lies a brilliant simplification of traditional baking principles. Instead of physical kneading, which develops gluten through mechanical action, this technique harnesses the power of time and natural fermentation. Here's how it works:
- Long Fermentation: The dough is allowed to rest for an extended period, typically 12 to 18 hours (and sometimes up to 24 hours), at room temperature. During this long rise, the yeast slowly consumes sugars in the flour, producing carbon dioxide that creates air pockets and, crucially, allowing enzymes to break down proteins. This natural process facilitates the development of gluten strands, forming the structural network responsible for bread's chewiness and texture, all without a single punch or fold from your hands.
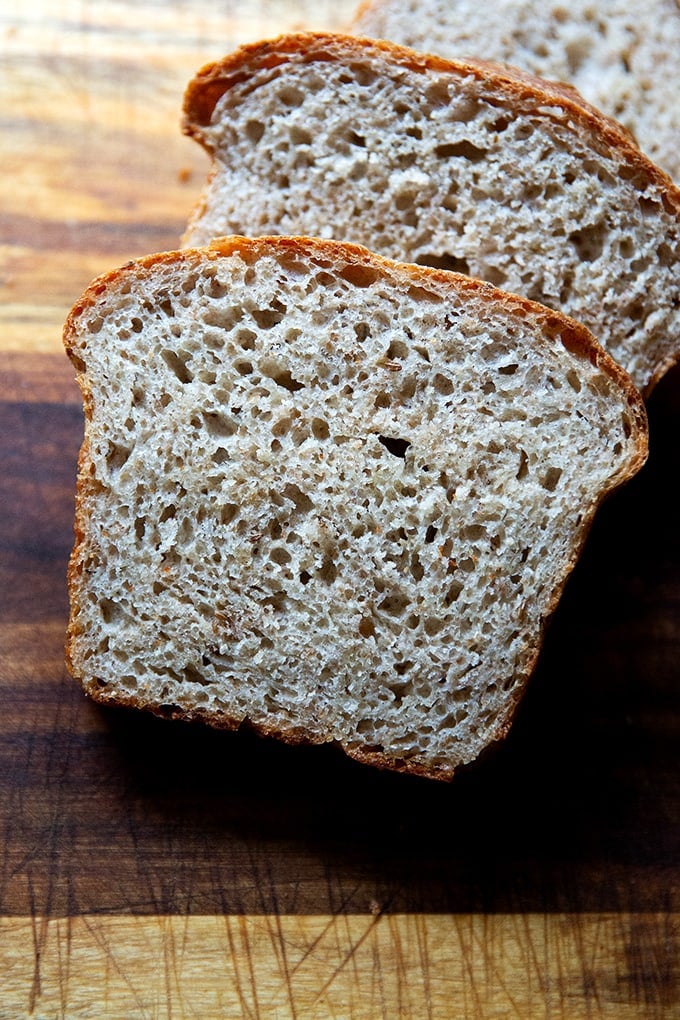
- High Hydration: No-knead doughs are notoriously wet and shaggy. This high water content is key. It allows the gluten strands to move and align more easily during the long fermentation, contributing to their development and resulting in an incredibly open, airy crumb structure. The wetness also creates that beautiful, crisp crust when baked.
- The Dutch Oven Effect: This is arguably the most critical component for achieving that professional bakery-quality crust. By preheating a heavy-bottomed pot with a lid, such as a Dutch oven, you create a mini, high-humidity oven within your regular oven. When the wet dough is dropped into the hot pot and covered, the trapped steam keeps the crust soft initially, allowing the loaf to expand maximally during the first stage of baking (the "oven spring"). Once the lid is removed, the direct heat crisps the exterior to a gorgeous golden-brown, creating those characteristic ridges and deep flavor. For more detailed insights into this baking technique, consider reading No-Knead Bread Secrets: Master Long Fermentation & Dutch Oven Baking.
The synergy of these elements results in a loaf that boasts a wonderfully complex flavor profile, thanks to the slow fermentation, and an irresistible texture – a deep, crackling crust giving way to a soft, airy, and chewy interior. It’s bread that tastes like it came from a professional oven, but only required minimal effort from the baker.
Your Journey to a Perfect Loaf: Essential Tips for No-Knead Success
Embarking on your no knead bread adventure is remarkably straightforward. While the exact proportions might vary slightly between recipes (Jim Lahey's original called for 3 cups of flour, later adjusted to 3⅓ cups for optimal results by Mark Bittman), the core process remains consistent. Here's a general guide and some crucial tips for success:
Ingredients You'll Need:
- Flour: All-purpose or bread flour works best. Bread flour often yields a slightly chewier result due to its higher protein content.
- Yeast: Instant yeast is preferred as it doesn't require activation. A generous ¼ teaspoon is typically sufficient, highlighting the power of slow fermentation.
- Salt: Kosher salt is common, contributing both flavor and acting as a yeast inhibitor, regulating its activity for a longer, more controlled rise.
- Water: Lukewarm water is ideal. Aim for a temperature around 95-105°F (35-40°C). Water that's too hot (above 120°F/49°C) can kill the yeast, preventing your bread from rising. Too cold, and it will slow down the yeast too much. Approximately 1½ cups (345 grams) is standard for 3⅓ cups of flour.
- Optional: Cornmeal or wheat bran for dusting.
Preparation Steps and Expert Tips:
- Combine Ingredients: In a large bowl, mix the flour, yeast, and salt. Add the water and stir until just blended. The dough will be very wet, shaggy, and sticky – this is exactly what you want! Resist the urge to add more flour.
- The Long Rest: Cover the bowl tightly with plastic wrap and let the dough rest at warm room temperature (around 70°F or 21°C) for at least 12 hours, but preferably 18 hours or even up to 24 hours. This is where the magic happens! The surface should be dotted with bubbles when ready.
- First Shape & Rest: Lightly flour your work surface. Gently scrape the dough onto it. Sprinkle with a little more flour and fold it over once or twice. Cover loosely with plastic wrap and let it rest for about 15 minutes. This step helps relax the gluten, making it easier to shape.
- Final Shape: With just enough flour to prevent sticking, gently and quickly shape the dough into a ball. Avoid overworking it.
- Second Rise: Generously coat a cotton towel (not terry cloth, which can stick) with flour, wheat bran, or cornmeal. Place the dough, seam-side down, on the towel and dust with more flour. Cover with another cotton towel and let it rise for about 2 hours. It should look puffy and a bit more expanded.
- Preheat & Bake: About 30 minutes before the second rise is complete, place your Dutch oven (with its lid) into your oven and preheat it to a high temperature, typically 450-475°F (230-245°C). The scorching hot pot is crucial for creating steam and achieving that incredible crust.
- Transfer and Bake: Carefully remove the hot Dutch oven. Using parchment paper to lift the dough (seam-side up) and transfer it into the screaming hot pot. Cover with the lid and bake for 30 minutes. The steam trapped inside will help create a superior rise and chewy interior.
- Crisp the Crust: Remove the lid and continue baking for another 15-20 minutes, or until the crust is deeply golden brown and crisp.
- Cool: Transfer the finished loaf to a wire rack and let it cool completely before slicing. This is perhaps the hardest part, but crucial for the crumb to set and achieve its proper texture and flavor.
For even more beginner-friendly advice, check out Easy No-Knead Bread: A Beginner's Guide to Homemade Perfection.
Elevating Your No-Knead Experience: Customization and Storage
While the basic no knead bread recipe is a masterpiece in itself, it also serves as a fantastic canvas for culinary creativity. You can easily adapt it to suit your tastes:
- Herbs and Aromatics: Stir in a few tablespoons of fresh or dried herbs like rosemary, thyme, or sage. Roasted garlic cloves or a pinch of garlic powder can also add a delightful savory note.
- Cheese: Fold in freshly grated Parmesan, Pecorino Romano, or shredded cheddar for a cheesy twist.
- Seeds and Grains: Incorporate sunflower seeds, pumpkin seeds, flax seeds, or even a handful of rolled oats for added texture and nutrition.
- Whole Grains: Experiment by replacing a portion of the all-purpose flour with whole wheat flour (e.g., 1 cup whole wheat, 2⅓ cups all-purpose) for a heartier loaf. You might need to adjust water slightly.
- Sweet Variations: While less common for the classic recipe, you could subtly sweeten it with a touch of honey or maple syrup and add dried cranberries or cinnamon for a breakfast-style bread.
Freezing for Future Enjoyment:
One of the best things about baking a delicious loaf is being able to enjoy it later. Once your no knead bread has cooled completely, you can freeze it to preserve its freshness. Wrap the entire loaf tightly in plastic wrap, ensuring no air gaps, then cover it again with aluminum foil. Stored this way, your bread can be frozen for up to 3 months. To enjoy, simply thaw it at room temperature and refresh it in a warm oven for a few minutes to bring back its crisp crust.
The Enduring Appeal: Why No-Knead Bread is Here to Stay
The enduring popularity of no knead bread is a testament to its genius. It strips away the intimidating aspects of traditional bread making, replacing them with patience and simplicity, while yielding results that rival professional bakeries. It's more than just a recipe; it's an invitation to embrace the rewarding world of home baking, offering a tangible connection to the food we eat.
Whether you're a complete novice or an experienced baker looking for an effortless routine, the no-knead method consistently delivers. Its versatility, ease of execution, and consistently delicious outcome ensure its place as a cherished staple in kitchens around the globe. So, if you haven't yet experienced the magic, now is the perfect time to discover why everyone raves about this incredibly easy and utterly satisfying recipe.
